
Local Open-Source AI Stack: Building Your Local Powerhouse
A guide to the essential software stack & HW for running high-performance AI models privately & locally, ensuring full control and no long-term costs.
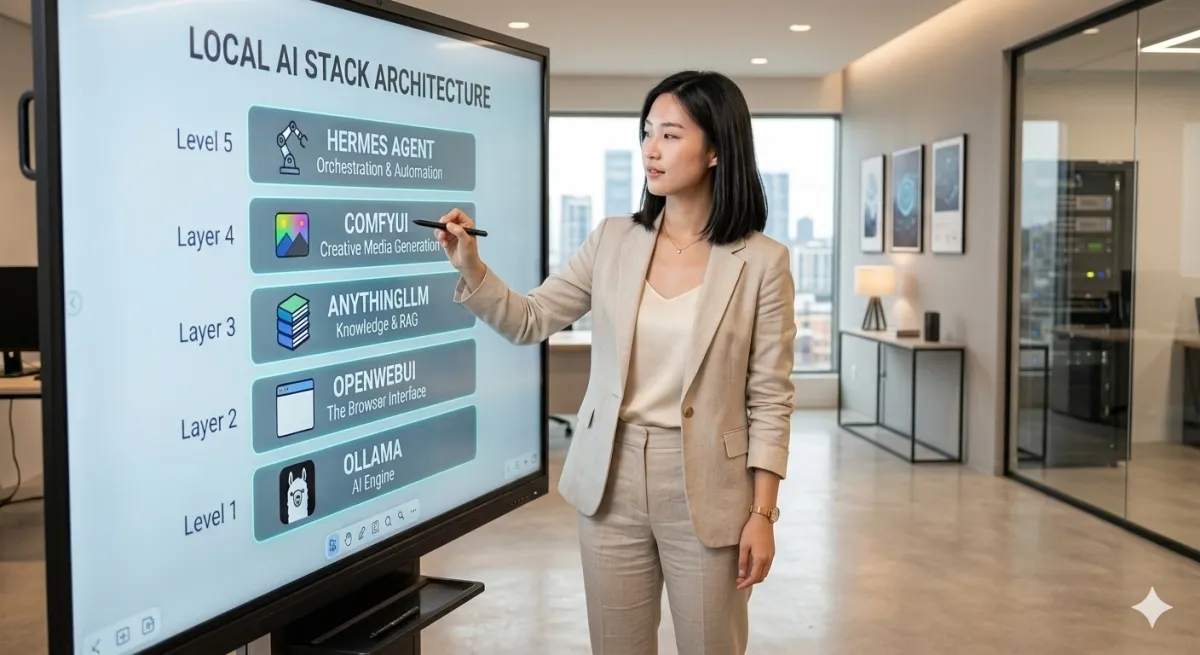
Table of Contents
- Why a Local AI Stack
- Architecture Overview
- Prerequisites
- Layer 1 - Ollama: Your AI Engine
- Layer 2 - OpenWebUI: The Browser Interface
- Layer 3 - AnythingLLM: Knowledge and RAG
- Layer 4 - ComfyUI: Creative Media Generation
- Layer 5 - Hermes Agent: Orchestration and Automation
- Model Routing with OpenRouter
- Pitfalls
- Verifying the Full Stack
- Conclusion and Next Steps
1. Why a Local AI Stack
Most AI setups fall into two extremes: fully cloud-hosted services where your data lives on someone else's servers, or half-baked local installs that never quite talk to each other. The goal is a fully local, open-source AI stack where every component runs on our own hardware, every connection is deliberate, and you own the data end to end.
The result is a five-layer architecture that covers everything from raw model inference to creative media generation and agent orchestration. This article walks through every step, every command, and every pitfall you might hit so you can build your own working system.
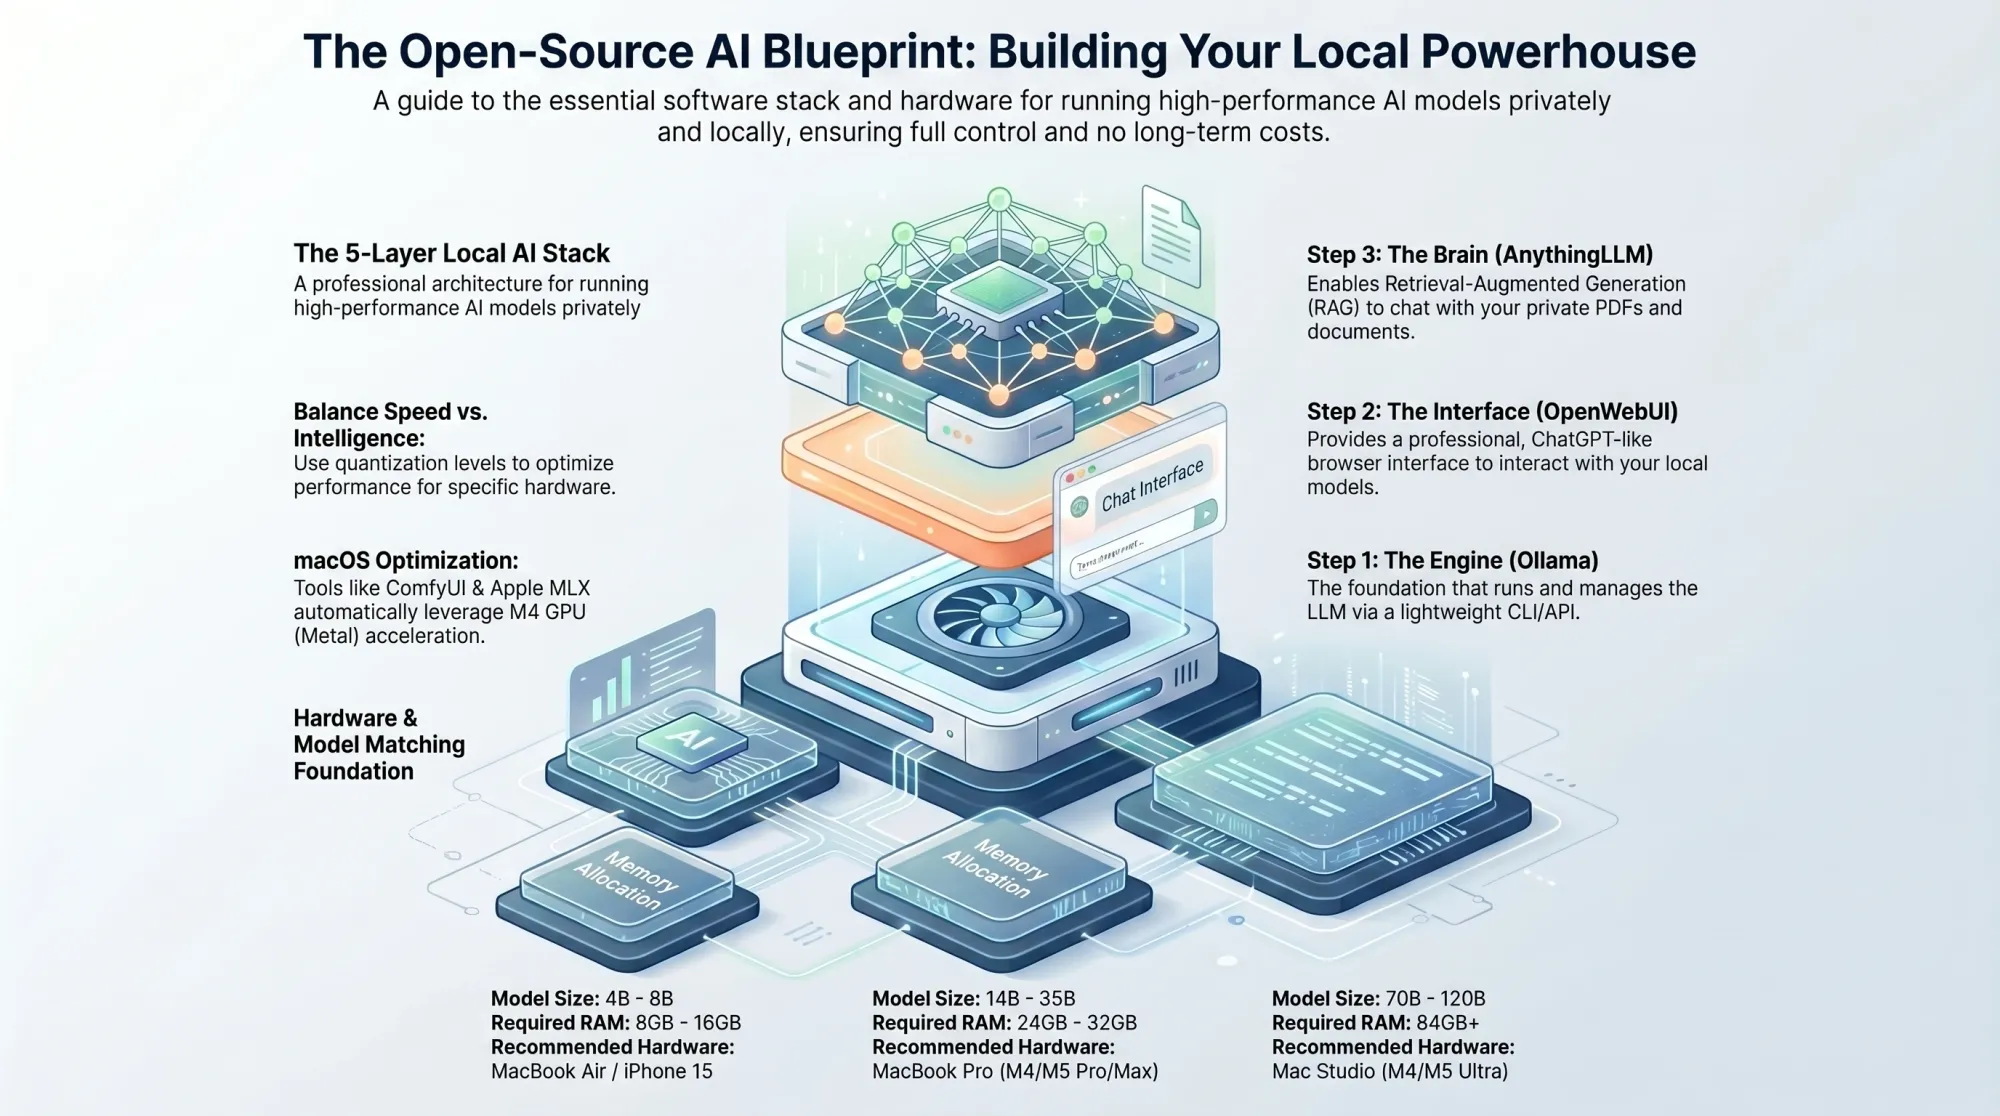
How it works under the hood: the car analogy
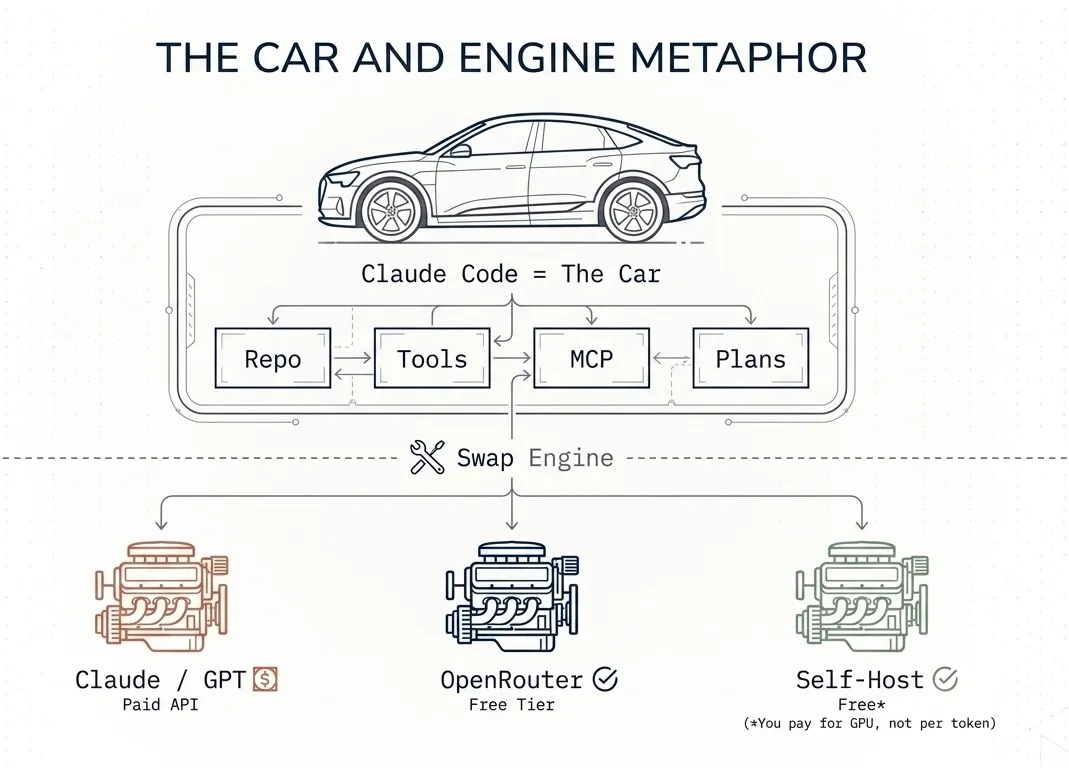
What are the benefits?
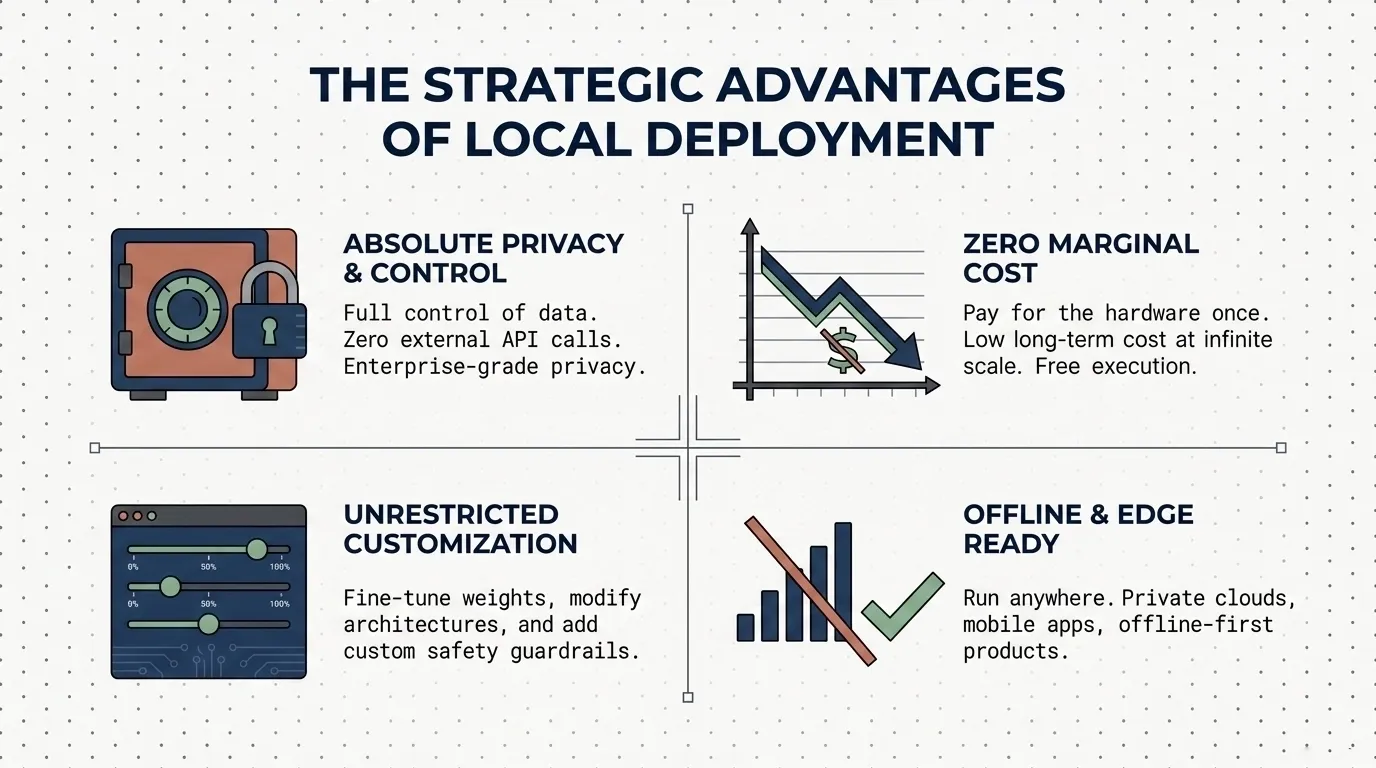
2. Architecture Overview
The stack is built from five distinct layers, each running as either a native macOS process or a Docker container. Here is the complete topology:
Layer 1 (Foundation)     Ollama [Native]
Layer 2 (Interface)      OpenWebUI [Docker]
Layer 3 (Knowledge/RAG)  AnythingLLM [Docker]
Layer 4 (Creative)       ComfyUI [Native]
Layer 5 (Orchestration)  Hermes Agent [Native]
Layer 5 (Management)     Hermes Desktop [Native GUI]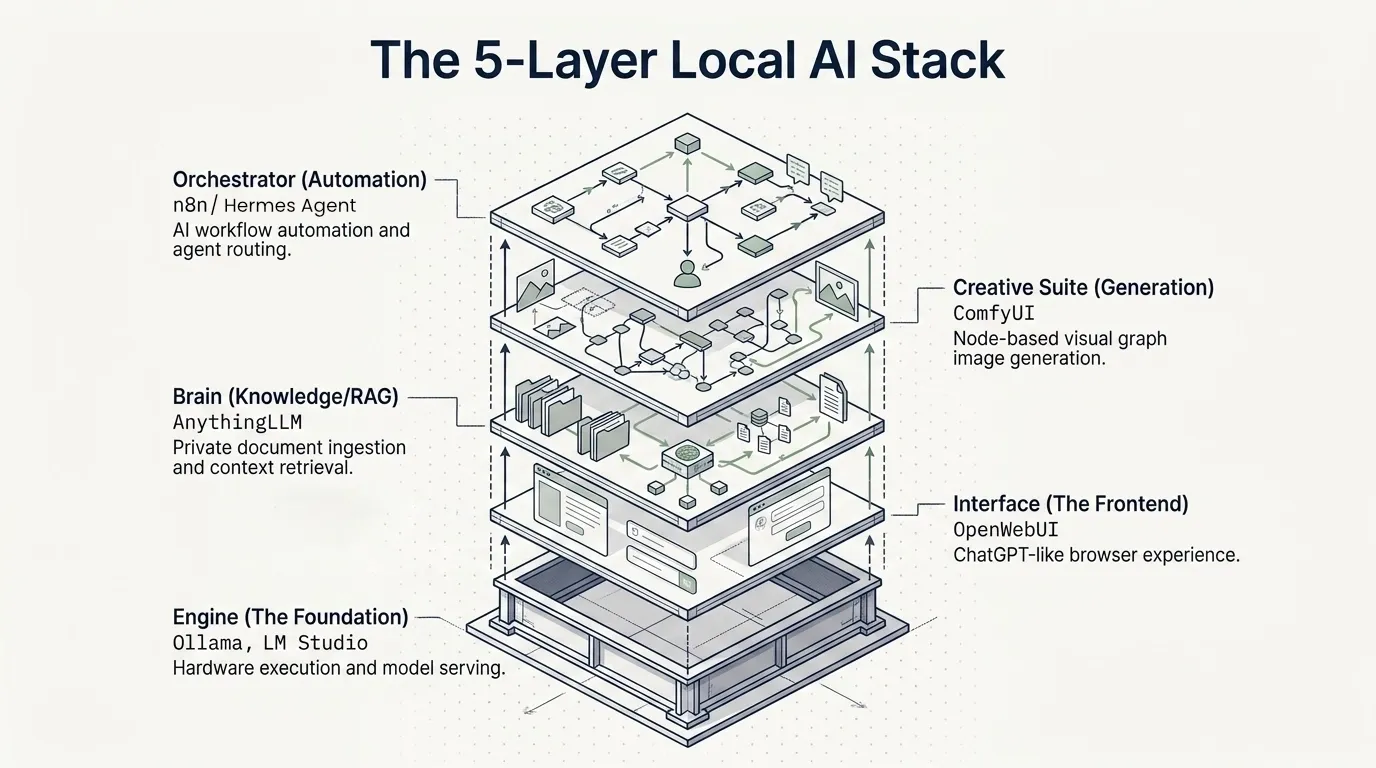
Deployment mode at a glance
| Service | Deployment | Port | Notes |
|---|---|---|---|
| Ollama | Native | 11434 | Local model inference engine |
| OpenWebUI | Docker | 3000 | Browser-based chat interface |
| AnythingLLM | Docker | 3001 | RAG knowledge base with vector search |
| ComfyUI | Native | 8000 | Local image and media generation |
| Hermes Agent | Native | 8642 | Agent orchestration via OpenRouter |
| Hermes Desktop | Native GUI | N/A | Session and skill management interface |
The Docker networking concept that matters most
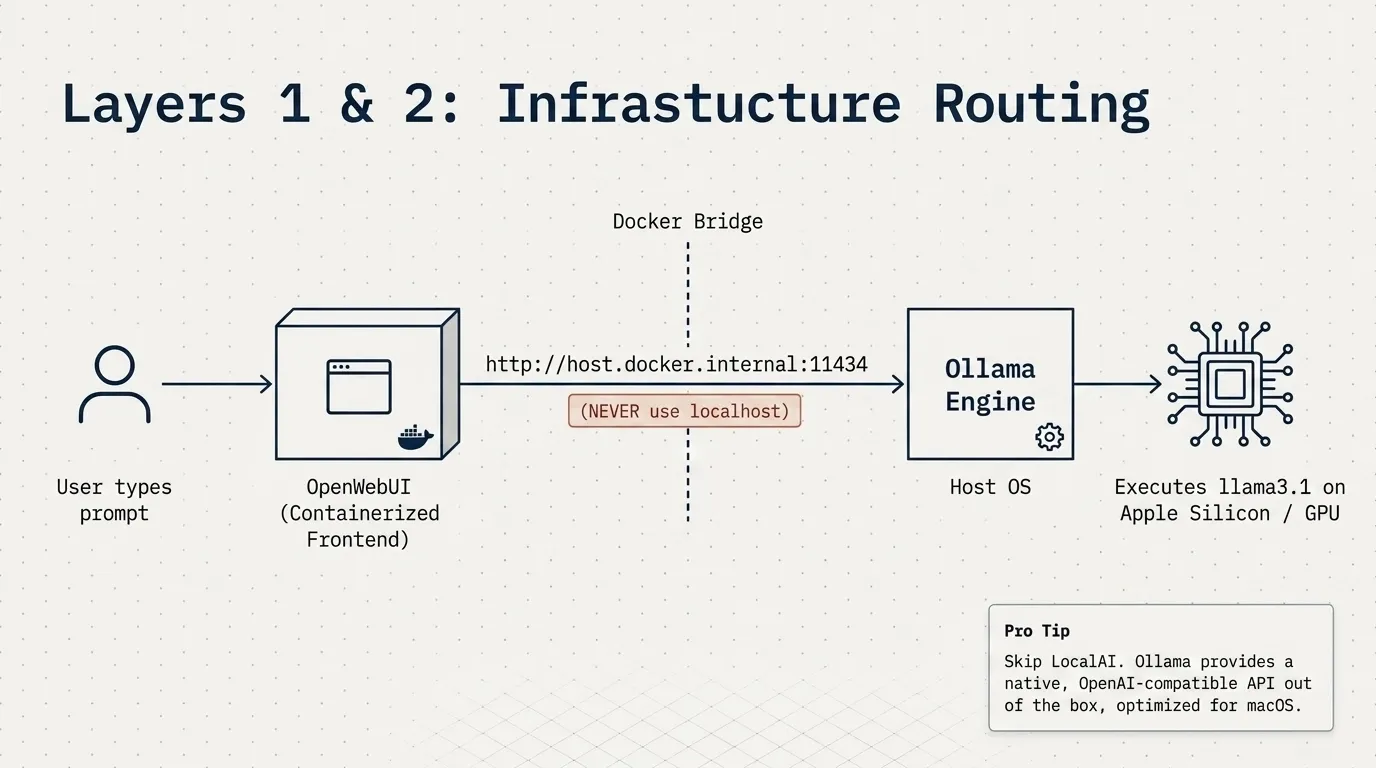
Ollama, ComfyUI, and Hermes all run natively on the host. OpenWebUI and AnythingLLM run inside Docker containers. For the containers to reach the native services, they must use host.docker.internal, NOT localhost.
This is the single most important networking concept in this entire setup. Inside a Docker container, localhost refers to the container itself, not the host machine. Any time a containerized service needs to talk to a natively running service, host.docker.internal is the hostname you need. We hit this wall more than once, so it is worth emphasizing upfront.
3. Prerequisites
Before starting, ensure you have the following in place:
- macOS with Apple Silicon (tested on M-series chips, but Intel Macs work too)
- Docker Desktop installed and running. This is critical. Docker Desktop must be running before you pull or start any images. We lost time assuming we could just run
docker runon demand. Start Docker Desktop first. - Homebrew for native package management
- Node.js (v18 or later) for Hermes Agent
- An OpenRouter API key for model routing. Get one at openrouter.ai.
- At least 16 GB RAM for the full stack with smaller models. 32 GB gives you more freedom with model sizes.
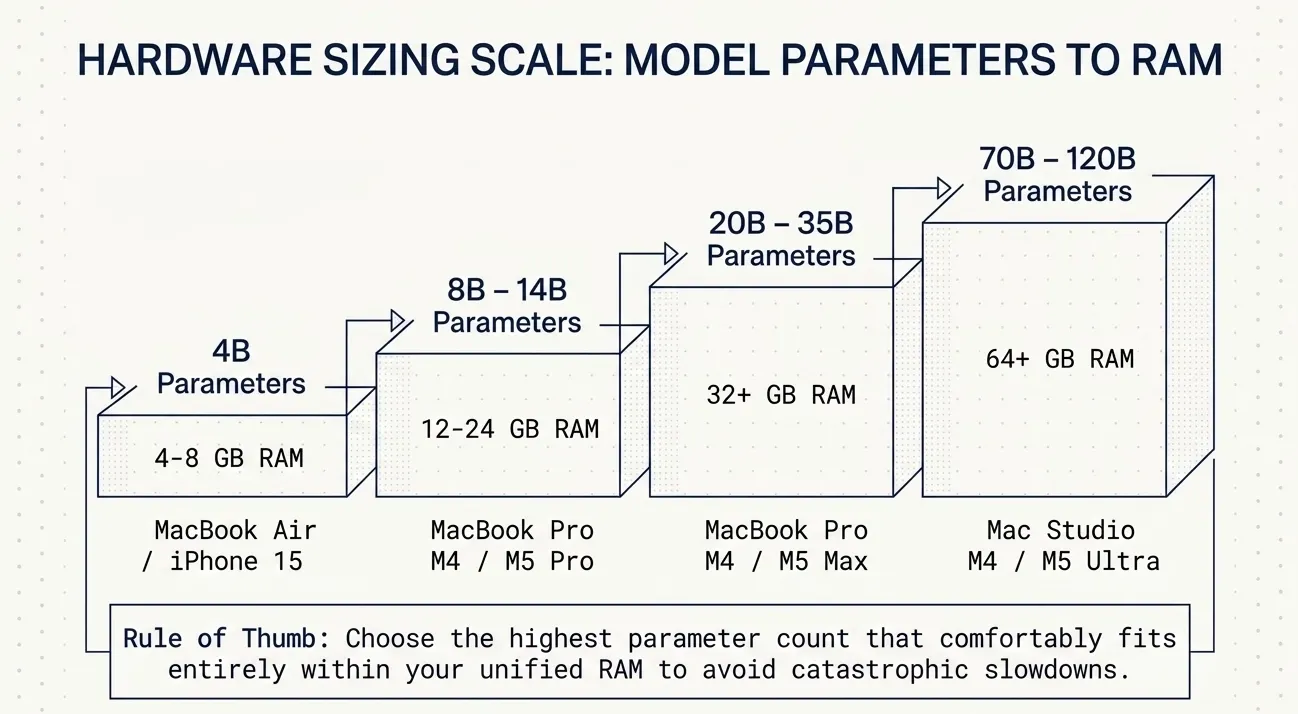
Model selection guidance
The amount of available RAM must be taken into account. Below you find a graphic to help you decide which LLM model is going to fit on your local machine, based on the unified RAM.
| Hardware | Recommended Starting Model | Notes |
|---|---|---|
| 16+ GB RAM | qwen3.5:9b or gemma4:e4b | Fits comfortably in memory |
| 32 GB RAM | Up to 14B parameter models | Can run larger, more capable |
| 64+ GB RAM | 30B+ models | Serious local inference power |
For our setup we choose qwen3.5:9b and gemma4:e4b . Both run well on 16+ GB hardware.
4. Layer 1 - Ollama: Your AI Engine
Ollama is the foundation. It is the local model runtime that serves model inference on http://localhost:11434. Everything else in this stack either talks to Ollama directly or talks to a service that talks to Ollama.
Step 1: Install Ollama
brew install ollama
Step 2: Start the Ollama service
ollama serve
On macOS with Homebrew, Ollama installs as a background service that starts automatically. You can verify it is running:
curl <http://localhost:11434/api/tags>
A successful response returns a JSON object listing your available models. If you get a connection refused error, Ollama is not running.
Step 3: Pull your first model
We recommend starting with a small model that runs responsively on consumer hardware, such as Qwen3.5 9B:
ollama pull qwen3.5:9b
We also pulled Gemma 4:
ollama pull gemma4:e4b
Step 4: Test a model directly
ollama run qwen3.5:9b "Hello from the local stack"
If you get a response, Layer 1 is working. This is the checkpoint to hit before moving forward.
5. Layer 2 - OpenWebUI: The Browser Interface
OpenWebUI provides the daily browser-based experience. It connects to Ollama for inference and gives you a polished chat interface with conversation history, model switching, and plugin support.
Step 1: Ensure Docker Desktop is running
This sounds obvious, but it is the most common mistake on macOS. If Docker Desktop is not running, docker run silently fails or hangs. Check the Docker Desktop app or run:
docker info
If you get connection errors, start Docker Desktop and wait for the engine to be ready.
Step 2: Launch OpenWebUI
docker run -d --name open-webui \\\\
  -p 3000:8080 \\\\
  -e OLLAMA_BASE_URL=http://host.docker.internal:11434 \\\\
  --add-host=host.docker.internal:host-gateway \\\\
  ghcr.io/open-webui/open-webui:main
Let us break down what each flag does:
| Flag | Purpose |
|---|---|
-d | Run detached in the background |
--name open-webui | Container name for easy management |
-p 3000:8080 | Map host port 3000 to container port 8080 |
-e OLLAMA_BASE_URL=http://host.docker.internal:11434 | Tell OpenWebUI where Ollama lives |
--add-host=host.docker.internal:host-gateway | Enable host.docker.internal DNS resolution |
The critical piece here is OLLAMA_BASE_URL. We use host.docker.internal:11434 because Ollama runs on the host, not inside the container. Using localhost:11434 here would cause OpenWebUI to look inside its own container for Ollama, which does not exist.
Step 3: Verify
Open your browser to http://localhost:3000. You should see the OpenWebUI setup page. Create an admin account, select a model from the dropdown, and send a test message.
If the model responds, your chat interface is connected to Ollama. Layer 2 is complete.
6. Layer 3 - AnythingLLM: Knowledge and RAG
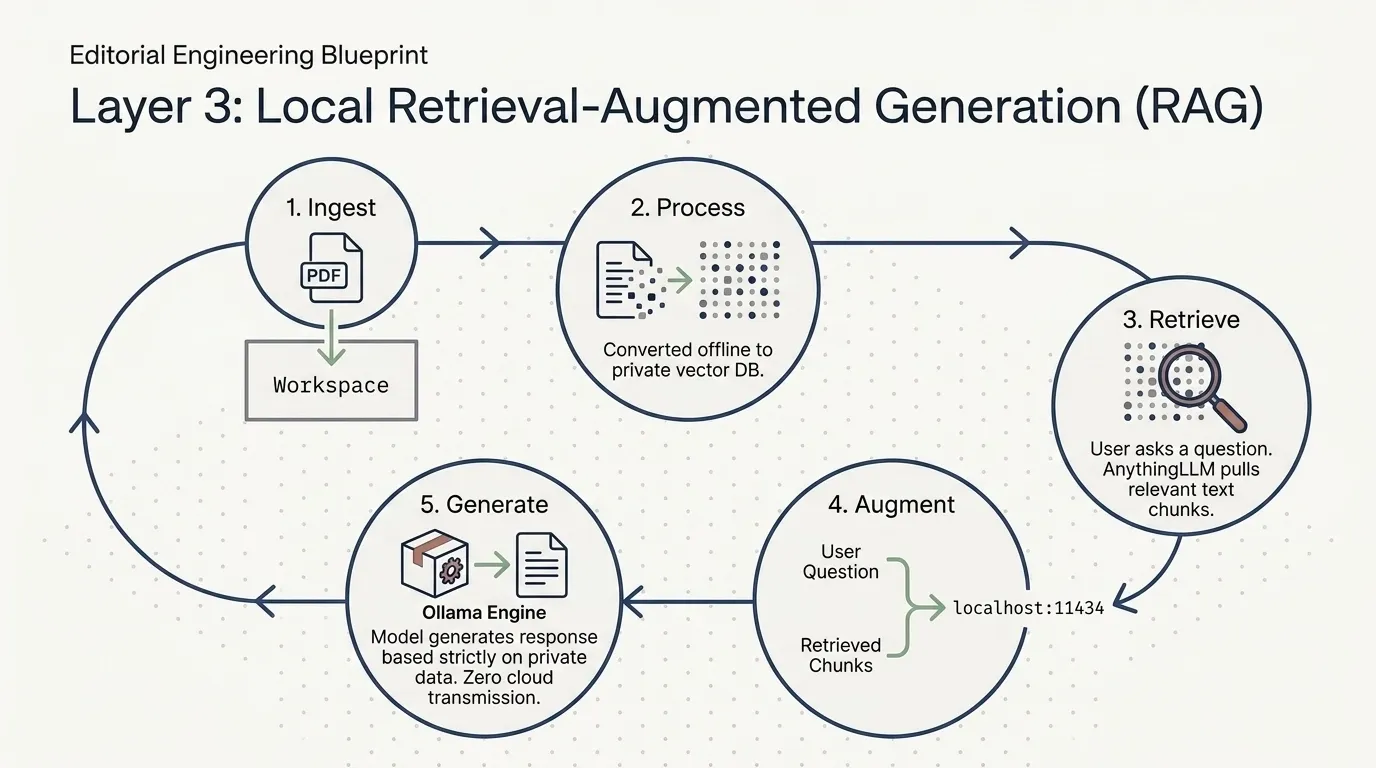
AnythingLLM is where local documents become searchable knowledge. It handles document ingestion, chunking, embedding, vector storage, retrieval, and prompt augmentation. In RAG terminology, it turns your files into an LLM-accessible wiki.
Step 1: Launch AnythingLLM
docker run -d --name anythingllm \\\\
  -p 3001:3001 \\\\
  --add-host=host.docker.internal:host-gateway \\\\
  mintplexlabs/anythingllm
AnythingLLM serves its web interface on port 3001. The --add-host flag enables it to reach Ollama on the host when we configure it in the setup wizard.
Step 2: Complete the setup wizard
Open http://localhost:3001 in your browser. The setup wizard walks you through three critical configuration choices:
- LLM Provider: Select Ollama. Enter the connection URL as
http://host.docker.internal:11434. This is the samehost.docker.internalpattern we used in OpenWebUI. - Embedding Model: Select Ollama again with the same URL http://host.docker.internal:11434. For the embedding model name, we recommend nomic-embed-text which you can pull with:
ollama pull nomic-embed-text
- This is a lightweight embedding model designed for local RAG pipelines. It produces vectors that AnythingLLM uses for semantic search across your documents.
- Vector Database: Select LanceDB. This is the local-first option that stores vector embeddings on your filesystem rather than sending them to a cloud service. It is the privacy-conscious choice and perfectly performant for personal knowledge bases.
Step 3: Create a workspace and ingest documents
Once configured, create a workspace in AnythingLLM, upload documents (PDFs, text files, markdown, web pages), and let it process them. The documents get chunked, embedded, and stored in LanceDB as vector records.
When you query the workspace, AnythingLLM retrieves the most relevant chunks, injects them into the prompt, and sends the augmented prompt to Ollama. The LLM then answers with knowledge drawn from your documents.
7. Layer 4 - ComfyUI: Creative Media Generation
ComfyUI is a node-based interface for Stable Diffusion and other generative image models. It provides local image generation, video generation, and complex media workflows.
Step 1: Download ComfyUI for macOS
Unlike most Python tools in this stack, ComfyUI is available as a native .app download for macOS. Head to the official ComfyUI releases and download the desktop application.
.app is the fastest path to a working installation on macOS.Step 2: Launch and verify
Open the ComfyUI app. It starts a local server on port 8000. The default workflow loads with a basic text-to-image pipeline. Run a test generation to confirm everything is working.
ComfyUI runs natively on the host, so other services reach it at http://localhost:8000 from the host or http://host.docker.internal:8000 from Docker containers.
8. Layer 5 - Hermes Agent: Orchestration and Automation
Hermes Agent by Nous Research is the orchestration layer. It exposes an OpenAI-compatible API server that coordinates model calls, skills, and agent sessions. This is where your stack transitions from a chat tool to an autonomous agent that can plan, execute, and chain tasks.
Step 1: Install Hermes Agent natively
We tried the Docker approach first. It does not work reliably on macOS Docker Desktop because of a loopback binding issue -- port 8642 binds to 127.0.0.1 inside the container, making it unreachable from the host network. After wrestling with this, we switched to a native install which works cleanly.
curl -fsSL <https://raw.githubusercontent.com/NousResearch/hermes-agent/main/scripts/install.sh> | bash
Step 2: Source your shell config
The installer adds Hermes to your PATH. Source your shell config to pick it up immediately:
source ~/.zshrc
Verify the installation:
hermes --version
Step 3: Configure the API key
Hermes requires an API key in ~/.hermes/.env. This is where you set your OpenRouter key for model routing:
# In ~/.hermes/.env:
OPENROUTER_API_KEY=your-key-here
This is a critical file. We had a production failure where this file got corrupted with ANSI escape sequences, and all LLM calls failed silently with HTTP 400 responses. See the pitfalls section below for details.
Step 4: Start the Hermes gateway
hermes gateway run
This starts the agent server on port 8642. It exposes OpenAI-compatible /v1 endpoints, so any OpenAI SDK or tool can talk to Hermes by pointing its base URL at http://localhost:8642/v1.
Step 5: Install Hermes Desktop
Hermes Desktop is the companion GUI application for session and skill management. It is a native macOS app that provides a visual interface for creating agent sessions, configuring skills, and monitoring execution. Download it from the Nous Research releases page.
With Hermes running, you have a full agent layer that can coordinate calls across your local models and OpenRouter hosted models.
9. Model Routing with OpenRouter
OpenRouter is the managed inference API that sits behind Hermes Agent. It provides access to 200+ models from providers including OpenAI, Anthropic, Google, Meta, and others – all through a single API endpoint.
The key advantage is model switching without code changes. Your applications talk to Hermes on port 8642, and Hermes routes to whatever model OpenRouter is configured to use. Changing models is a configuration update, not a code refactor.
Models we tested through OpenRouter
| Model | Provider | Notes |
|---|---|---|
qwen/qwen3.6-plus | Qwen | Strong general-purpose reasoning |
anthropic/claude-sonnet-4-6-20250514 | Anthropic | High-capability reasoning with tool use |
For local-only inference with smaller models, Ollama handles the workload directly. For heavier reasoning tasks or when you need a stronger model than your hardware can run locally, Hermes routes the request through OpenRouter. This gives you the best of both worlds: local control for everyday tasks and cloud-scale models when you need them.
10. Pitfalls
These are the issues that cost us hours. Read this section before you start, and you will save yourself the same pain.
Pitfall 1: Docker Desktop must be running first
On macOS, Docker Desktop is not always auto-starting. Running docker run while Docker Desktop is down produces confusing errors or silent hangs. Always verify:
docker info
If Docker Desktop shows as unavailable, open the app and wait for the engine indicator to turn green before pulling or running any images.
Pitfall 2: Hermes Docker container has a loopback binding issue on macOS
We initially tried to run Hermes Agent in Docker using a standard port mapping. On macOS Docker Desktop, port 8642 binds to 127.0.0.1 inside the container, making it inaccessible from the host network. The container starts fine, the port maps fine from Docker's perspective, but the process inside the container only listens on the container's own loopback interface. Nothing outside the container can reach it.
The fix is straightforward: install Hermes natively using the official install script instead of Docker. The native install starts the gateway process directly on the host, bound to the correct interface, and everything works.
Pitfall 3: Hermes API key corruption with ANSI escape sequences
The ~/.hermes/.env file is where Hermes stores its API keys. We encountered a situation where this file got corrupted with ANSI escape sequences (terminal color codes leaked into the file somehow, likely from a poorly formatted redirect or copy-paste).
The symptom was that all LLM calls through Hermes failed silently with HTTP 400 responses. No error messages, no helpful logs – just silent failures. The request went through, but the corrupted API key was rejected by the upstream provider.
The fix:
- Open
~/.hermes/.envin a plain text editor - Remove any non-printable characters or escape sequences
- Ensure the file contains only plain text in the format
KEY=value - Restart the Hermes gateway (see below)
Pitfall 4: Hermes gateway must be restarted after .env changes
After editing ~/.hermes/.env, the running Hermes gateway process does not automatically pick up the new configuration. You must stop and restart it:
# Stop the running gateway (Ctrl+C in the terminal where it runs)
# Then restart:
hermes gateway run
If you skip this step, Hermes continues using the old configuration, and you will wonder why your changes did not take effect.
Pitfall 5: AnythingLLM setup wizard requires manual configuration
AnythingLLM does not auto-detect Ollama or your embedding model. The setup wizard requires you to manually select each component:
- LLM provider must be set to Ollama with the URL
http://host.docker.internal:11434 - Embedding provider must be set to Ollama with the same URL
- Vector database must be manually selected as LanceDB
If you skip any of these steps or use localhost instead of host.docker.internal, AnythingLLM cannot reach Ollama from inside its container.
Pitfall 6: ComfyUI is a .app on macOS, not a pip install
ComfyUI documentation often references Python installation instructions that work on Linux. On macOS, the correct path is to download the native .app from the official releases. Pip installations require additional dependencies, build tools, and troubleshooting that the .app sidesteps entirely.
11. Verifying the Full Stack
Once all layers are running, verify connectivity end to end.
Quick health checks
# Layer 1: Ollama
curl <http://localhost:11434/api/tags> | python3 -m json.tool

# Layer 2: OpenWebUI
curl -s -o /dev/null -w "%{http_code}" <http://localhost:3000>

# Layer 3: AnythingLLM
curl -s -o /dev/null -w "%{http_code}" <http://localhost:3001>

# Layer 4: ComfyUI
curl -s -o /dev/null -w "%{http_code}" <http://localhost:8000>

# Layer 5: Hermes Agent
curl -s -o /dev/null -w "%{http_code}" <http://localhost:8642/v1/models>
Expected responses
| Service | Expected Status | What it means |
|---|---|---|
| Ollama | 200 | Model engine is serving |
| OpenWebUI | 200 | Chat interface is up |
| AnythingLLM | 200 | RAG platform is running |
| ComfyUI | 200 | Creative suite is ready |
| Hermes | 200 | Agent API is accessible |
Full stack test
With everything healthy, the end-to-end flow looks like this:
- Open OpenWebUI at
http://localhost:3000and chat with a local Ollama model - Open AnythingLLM at
http://localhost:3001, create a workspace, upload a document, and ask a question that requires document retrieval - Launch ComfyUI and generate an image from a text prompt
- Open Hermes Desktop and create an agent session that coordinates across models
If all four work, your stack is fully operational.
12. Conclusion and Next Steps
Where to go from here
We built a five-layer local AI stack that runs entirely under our own control. Ollama provides the inference foundation, OpenWebUI is the daily interface, AnythingLLM turns documents into searchable knowledge, ComfyUI handles creative media generation, and Hermes Agent orchestrates the whole system through OpenRouter managed inference.
The hardest lessons we learned:
- Docker containers reach native services through
host.docker.internal, notlocalhost - Hermes does not work reliably in Docker on macOS – install it natively
- API key files must be plain text, with no escape sequences
- Restart services after configuration changes
- Always start Docker Desktop before running container commands
All of these are documented in the pitfalls section above. If you read that section before starting, you will avoid most of the friction we encountered.
Where to go from here
- Build RAG workflows in AnythingLLM with structured document ingestion and workspace-specific knowledge bases
- Experiment with ComfyUI node workflows for automated image generation pipelines
- Create Hermes Agent skills that chain together model calls, file operations, and API requests
- Add n8n or another workflow orchestrator to coordinate triggers and scheduled agent tasks
- Swap models freely between Ollama local models and OpenRouter hosted models without changing any application code
The stack is designed to be modular. You can run the full system, or pick individual layers based on your needs. Start with Ollama and OpenWebUI, add RAG when you need document search, add Hermes when you want agent capabilities, and add ComfyUI when you need local media generation. Each layer is independently useful, and together they form a complete local AI platform.